

Microsoft .NET brings many important advances to the software engineering world.
We believe that Windows developers everywhere have reason to celebrate the arrival of .NET, but Visual Basic developers should be the most ecstatic. We get true inheritance, structured exception handling, and a state-of-the-art IDE?but, perhaps the coolest thing .NET provides us as VB developers is the Framework Class Library (FCL). To commemorate the release of .NET, we thought we would present what we consider to be the top ten most useful, utterly awesome (and coolest) classes bundled inside the .NET FCL.
The DataSet Class
Question: What looks like a database, can be populated with just a few lines of code, and is inherently disconnected? Answer: A DataSet.
.NET exposes two ways for programmers to interact with relational databases, each optimized for a specific set of circumstances. Command objects, available in different flavors depending on the database engine you are using, are used to execute commands directly against a data store. For instance, using the SqlCommand class, you can post SQL commands directly to SQL Server databases. The OleDbCommand class performs that same duty against a wide range of OLE DB compliant data sources. These classes are optimized for fast, forward-only cursor operations against data.
They are extremely useful at grabbing static result sets quickly from a server and then displaying that data to a user. What they don't do well is offer developers a way to optimally manipulate data off of a server. This is where the second primary method for data access enters the scene: the DataSet class. The DataSet class is an ideal component to use for cross-tier communication, a common task that Internet applications and web services must perform.
Why is the DataSet class so cool?
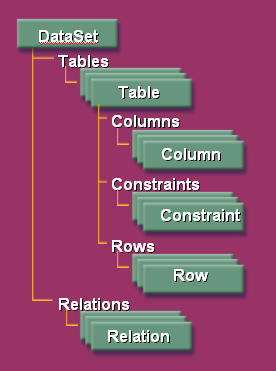
Well, for one, it is really a virtual, in-memory representation of data and, as such, is a database in its own right. The DataSet is comprised of one or more DataTable objects, which in turn contain columns and rows collections, and constraints. The relationships (foreign keys) between the tables are maintained by a Relations collection. This means that you, as the developer, can interact with DataSets using the same terminology and semantics you are used to using with databases.
In addition, DataSet objects are inherently disconnected. In fact, DataSet objects don't need to be connected to a database at all, at any time! They could be created on the fly, for instance, to satisfy internal application storage needs. There is no need to worry about “special” syntax or confusing programming constructs to create disconnected objects for cross-tier communication. The DataSet quite handily fills this role right out of the box.
The DataSet class has the built-in ability to serialize its data and schema information to and from XML. This is an absolutely amazing feature for enabling quick and painless cross-tier communication.
The DataSet class rounds out its distributed characteristics by supporting a full concurrency model internally. That means that DataSet objects not only hold the current state of data, but they also maintain the previous state of data. When it comes time to update a data store, an optimistic concurrency mechanism is used. Errors that occur are raised back through the application in a consistent fashion.
The following code (Listing 1) is a real quick look at how to populate a DataSet from a database and return it to a consuming client via XML. The fictitious function peers into a SQL server database (referenced by the supplied connStr parameter) and returns an XML string representing all of the customer records selected by the zipcode parameter. A SqlDataAdapter is used to fill a DataSet object, which then returns its data as XML through the function.
Listing 1: Populating a DataSet object
Imports System.Data
Imports System.Data.SqlClient

Public Class DStoreSearch
    Public Function RetCustomers(ByVal _
      connStr As String, _

     ByVal zipcode As String) As String
        'local scope
        Dim cmd As SqlCommand
        Dim cnn As SqlConnection
        Dim customers As DataSet
        Dim adapter As New SqlDataAdapter()

        Try

            'open the database connection
            cnn = New SqlConnection(connStr)
            cnn.Open()

            'grab all customers in the identified zipcode
            cmd = New SqlCommand()
            cmd.Connection = cnn
            cmd.CommandText = "select_customers_by_zip"
            cmd.CommandType = CommandType.StoredProcedure
            cmd.Parameters.Add("@zip", _
               SqlDbType.VarChar).Value = zipcode

            adapter.SelectCommand = cmd

            'This is where we fill our DataSet using the
            'result set returned from the stored
            'procedure
            adapter.Fill(customers)

            Return customers.GetXml()

        Catch sqlErr As SqlException

            'deal with db errors here

        Catch e As Exception

            'deal with all other errors here

        Finally

            'close and dispose the connection and command
            'objects
            cnn.Close()
            cnn.Dispose()
            cmd.Dispose()

        End Try

    End Function

End Class
The EventLog Class
Windows event logs have always been a great debugging tool. Unfortunately, Visual Basic developers have had to jump through hurdles to perform a simple act like writing custom messages to the event log. No longer! The EventLog class is cool simply because it allows you to quickly and cleanly write entries out to local or remote windows event logs.
With prior versions of Visual Basic, you could write to the event log in a limited fashion: the messages always came through under the same source and you had no real control over the event ID. Registering an application and a custom event source required painful trips into other languages or third-party libraries.
With the EventLog class, you can specify the source, message, event ID, and message type. In addition, you can specify the actual log to write to (application, system, etc.). There is also a robust set of methods for reading contents out of event logs. There isn't anything really dazzling about this class; it is remarkable only because it has been sorely missed in all prior versions of Visual Basic. Visual Basic developers finally have intrinsic event log capabilities! If the specified event source doesn't exist, it will be registered with the system automatically. In the following snippet, you see a common use for event logging: verbalizing errors into the application log.
Try

     'body of code goes here

Catch e As Exception

     EventLog.WriteEntry("MyApp", e.Message, _
      System.Diagnostics.EventLogEntryType.Error)

Finally

     'close and dispose the connection object

End Try
But, what if you want to read from an event log? The code to iterate through event log entries is equally simple. The following complete console application writes out every application event log entry to the console window.
Module Module1

  Sub Main()

    Dim log As New EventLog()
    log.Log = "Application"

    Dim entry As EventLogEntry

    For Each entry In log.Entries
      Console.WriteLine(entry.EntryType.ToString _
        & " " & _
        entry.TimeWritten & " " & _
        entry.Source & " " & _
        entry.EventID & " " & vbCrLf & _
        entry.Message & vbCrLf)
    Next entry

    Console.ReadLine()

  End Sub

End Module
The WebClient Class
If you have ever needed to send or receive data from a URL, the Framework class library has just the component for you. Residing in the System.Net namespace, the WebClient class exposes three methods for downloading data from a remote resource, and four methods for uploading raw data or files to a remote resource. In general, this class is a great way for accomplishing HTTP:, HTTPS: and FILE: protocol communications. Table 1 gives a brief run down of these methods.
Listing 2 shows how downloading a file is a pretty simple thing to do.
Listing 2: Code to Download files from the Internet
Imports System.Net

Module Module1

    Sub Main()
        Dim url As String
        Dim file As String

        Try
            'capture the URL
            Console.WriteLine(_
                 "Enter the URL of the file:")
            url = Console.ReadLine()

            Console.WriteLine("Enter the file name:")
            file = Console.ReadLine()

            'here is the WebClient piece...
            'just 2 lines of code!
            Dim client As New WebClient()
            client.DownloadFile(url, file)

            Console.WriteLine("File downloaded.")

            Console.ReadLine()

        Catch netErr As System.Net.WebException
            Console.WriteLine(_
                "Error: {0}", netErr.Message)

        End Try

    End Sub

End Module
In a similar fashion, files can be uploaded:
Client.UploadFile(url, "POST", myFile)
The Thread Class
The .NET Framework provides a set of classes for the creation and management of multi-threaded applications. By using the Thread class, you can:
- Create a new thread
- Set the thread's priority
- Start and stop execution of the thread
- Query for the thread's current state
Actually, the .NET Framework doesn't just deliver one class for threaded programming, it delivers an entire namespace (System.Threading), which contains all sorts of useful items for managing threads and helping you deal with threading concurrency issues (thread collisions are not good).
So how hard is it to start up a body of code on a new thread? As it turns out, it's not difficult at all. As a test bed, let's assume that we have a class (cunningly called SomeClass), which exposes a method that we want to run on our new thread:
Class SomeClass

    Public Sub GetFile()

        'this code will get its own thread
        Dim web As New WebClient()
        web.DownloadFile(_
           "http://www.brilliantstorm.com", _
           "index.htm")

    End Sub
End Class
So far so good? Listing 3 creates a simple console app that will create a new thread and point the thread at the 'GetFile' method (above):
Listing 3: Code to demonstrate creating a thread
Module Module1
    Sub Main()

        Dim obj As SomeClass

        Try
            'capture the URL
           Console.WriteLine(_
               "Hit 'ENTER' to start the d/l")
            Console.ReadLine()

            'this sub spools up the new thread
            StartThread()

            Console.ReadLine()

        Catch appErr As System.Exception
            Console.WriteLine(_
                  "Error: {0}", appErr.Message)
        End Try
    End Sub

    Sub StartThread()
        Dim obj As New SomeClass()
        Dim myThread As Thread

        'create a new thread
        myThread = New Thread(AddressOf obj.GetFile)

        'start the thread
        myThread.Start()
    End Sub

End Module
Notice that when we create our new thread object, we pass a pointer into the constructor that references the body of code that we want to run on the thread.
After that, we simply call the Start method to get the ball rolling. The thread will run to completion and then die. Of course, the beauty of creating a new thread is that our main path of execution won't block while the thread is running. In other words, as soon as the console app calls StartThread(), the console will continue to run while the execution path ‘forks’: we have one path running through the console app on the primary thread, and a new path running through the 'GetFile' method.
A caveat that we have to mention: just because you can easily create threads doesn't mean you should. Even in this simple example, there are a variety of hidden ‘gotchas’ lurking amongst the lines of code. For instance, how would you signal that the download was complete? What if the same body of code was executed across multiple threads? Multithreading has its place in the world of application development. Just remember to do your research carefully and design your application to avoid thread contention.
The UserControl Class
Visual Basic has always been a great tool for rapidly creating user interfaces. Its drag-and-drop model of forms and components put the rapid in RAD a long time ago. Unfortunately, there has always been a disconnect in VB between forms and other code constructs. The way developers interacted with forms was limited to drag-and-drop operations, and there were no rich, programmable interfaces to use to customize forms. With .NET, this all changes. A form is simply another class that is exposed by the .NET Framework. While Visual Studio .NET sports a world-class development environment and forms editor, it is entirely possible to program windows forms applications using Notepad and some patience.
Because forms now sit inside of an object-oriented framework, it is possible to start realizing the benefits of classes in the visual world of form design. Enter the UserControl class. By enabling developers to stitch together custom functionality based on existing controls, the UserControl class bundles behaviors and properties together in one package that can be reused across any of your applications.
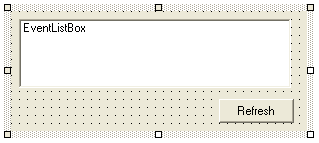
As an example, let's build on the previously discussed event log sample and turn it into a sort of visual control that other developers could then include in their projects. For simplicity's sake, this code will populate a simple list box that will show the message for every event in the application event log. It will also toss in a refresh button that will re-query the application event log and re-fill the list box.
To get started, start Visual Studio .NET and create a new WindowsControlLibrary project. Then, drag and drop two controls, a listbox and a button, onto your form. You should end up with something that looks like the picture in Figure 2.
Next, anchor the list box to the top, left, bottom, and right, and anchor the button to the right and to the bottom (this will allow developers who use the control to easily re-size it to fit their forms). Finally, insert the event log enumeration code behind the refresh button to populate the listbox:
Private Sub RefreshButton_Click(ByVal _
  sender As _
 System.Object, ByVal e As System.EventArgs) _
Handles RefreshButton.Click

       Dim log As New EventLog()
       log.Log = "Application"

       Dim entry As EventLogEntry
       EventListBox.Items.Clear()

       For Each entry In log.Entries
          EventListBox.Items.Add(entry.Message)
       Next entry

 End Sub
That's it. Simply build the project, and you (and other developers) can then reference the compiled assembly, at which point it will show up in the toolbox window along with the other controls bundled with .NET. And, just as with the other controls, you can simply drag and drop the control onto a form, set its properties, and size it to your liking.
Voila! Code reuse for forms controls!
The FileSystemWatcher Class
How many times have you been asked to write a component that periodically checks a directory for a file and processes that file? We're sure that nearly every VB programmer has been asked to code this task at one time or another. Well, the FCL makes it easy!
Inside the System.IO namespace exists the FileSystemWatcher class. This class notifies your application of changes made to a directory. With a few simple lines of code, your class can receive notification (as events) when users drop a file into a given directory, delete a file or change a file?you can even monitor changes inside the directory's subdirectories.
To code with the FileSystemWatcher, you typically follow these simple steps:
We've created a short console application (Listing 4) that demonstrates these steps. We first indicate the directory to watch on the FileSystemWatcher's constructor ("c:\watch"). We then wire the Created event to our OnFileCreate routine. Every time a new file is created in the watched directory, the OnFileCreate method is called. In this method, we simply write the new file's name out to the console.
Listing 4: Code to watch for a file
Imports System.IO

Module Module1

  Sub Main()

    'purpose: demonstrates FileSystemWatcher

    'create a new file system watcher class
    Dim myWatchedDir As New _
      FileSystemWatcher(Path:="c:\watch")

    'wire up your event handlers to the fsw event
    AddHandler myWatchedDir.Created, _
               AddressOf OnFileCreate

    'tell the watcher to start watching
    myWatchedDir.EnableRaisingEvents = True

    'keep console app running while waiting
    Do While Console.ReadLine <> "s" : Loop

  End Sub

  Sub OnFileCreate(ByVal source As Object, _
    ByVal e As FileSystemEventArgs)

    'write the new file's name to the console
    Console.WriteLine("Created file: " & e.Name)

  End Sub

End Module
Of course, this is a pretty straightforward example. You would most likely want to use more of the System.IO classes to read the contents of the file and respond accordingly.
The FileSystemWatcher class itself has many more features than we can go into here; it is full-featured. For instance, you can specify which types of files to watch for, using its Filter property. Setting Filter to “*.xyz” for example, will only respond when documents with the extension “xyz” are placed in the directory.
The next time you're asked to ping a directory and respond to changes, you'll have the FileSystemWatcher in your tool belt to make coding this task a snap.
The ServicedComponent Class
VB developers have traditionally been short-changed where COM+ enterprise services were concerned. You could access some of the services some of the time, but your applications were never able to fully realize the promises of COM+. The ServicedComponent class promises to remedy the situation. For the first time, VB developers can create objects that use all the functionality exposed by COM+ services: pooled components, queued objects and loosely coupled events are now all fully accessible!
To take advantage of COM+, your .NET object must inherit directly from the ServicedComponent base class. This class is found inside the System.EnterpriseServices namespace. Typically, you will then set class-level attributes indicating which COM+ services your class uses. For example, to indicate your components should be pooled, you would use the ObjectPoolingAttribute. Finally, you register your component with a COM+ application.
The following code (Listing 5) is a basic example of a .NET serviced component. You first set a reference to the System.EnterpriseServices namespace from within your project. You then create a class that derives from ServicedComponent and set attributes on the class.
Listing 5: .NET Serviced Component Setup Code
<ObjectPoolingAttribute(MinPoolSize:=4, MaxPoolSize:=6),_
Transaction(TransactionOption.Required)> _
Public Class MyPooledObject

    Inherits ServicedComponent

    Protected Overrides Sub Activate()

        'this method is called when the object is
        '   pulled from the pool and activated as
        '   an actual instance

    End Sub

    Protected Overrides Sub Deactivate()

        'this method is called just before the object
        '  is placed back into the pool

    End Sub

    Protected Overrides Function CanBePooled() As Boolean

        'indicate that this object can be pooled
        Return True

    End Function

End Class
The ServiceBase Class
Windows developers are not strangers to services: applications that survive reboots, run without a user interface, and can be stopped, started and paused. Most applications have some need for a service or two. VB developers, however, have been traditionally left in the cold where services are concerned. The only real solution was to use third-party controls. Even then, these services were difficult to install and uninstall and impossible to debug as a service. Developers migrating to .NET will be pleased to know that service applications are now easy to create, debug and install, thanks to the ServiceBase class.
Services written within the .NET Framework derive from the ServiceBase class. There are a couple of ways for developers to create a service using the FCL and VS.NET. One easy way is to use the VB.NET service project type. This project type starts you off with the basic service code and enables you to drag a service installer onto your component designer from the toolbox. This is very effective, but, like most developers, you'll want complete access and understanding regarding your .NET service code. Fortunately, the FCL makes it pretty easy to create a service from straight code. The following are the basic steps involved:
Listing 6 shows a simple example of steps 1-5 that pertain to ServiceBase.
Listing 6: Code to create a Windows Service
Imports System.ServiceProcess

Public Class MyDotNetService

    'inherits the service base class
    Inherits ServiceBase

    Public Sub New()

        'override the constructor for your own purposes

        'allow ServiceBase to execute its constructor
        MyBase.New()

        'set your service's name
        Me.ServiceName = "My DotNet Service"

        'indicate you can receive stop event only
        Me.CanPauseAndContinue = False
        Me.CanStop = True

    End Sub

    Shared Sub Main()

        'run an instance of your service class
        '   to load it into memory
        ServiceBase.Run(New MyDotNetService())

    End Sub

    Protected Overrides Sub OnStart(ByVal args() _
           As String)

        'override the the ServiceBase OnStart event
        '   create service-level resources

    End Sub

    Protected Overrides Sub OnStop()

        'override the the ServiceBase OnStop event
        '   free resources on service stop

    End Sub

End Class
Note: for more details on developing service applications with the FCL, see our article in the prior issue of Component Developer Magazine.
The Queue Class
The Queue class gives VB developers a simple mechanism for creating message queue-like features in their applications. This class is found in the System.Collections namespace. This namespace, and its counterpart, System.Collections.Specialized, provide developers with a host of new options for managing, storing and manipulating groups of objects. VB developers (used to the basic VB collection object or even the dictionary object found inside of VB6) will be excited about the multitude of new options .NET makes available. We singled out the Queue class to provide you with a sample.
When learning the Queue class, it's easiest to think in terms of messaging. Items sent to the queue can be thought of as messages. A message is queued in the order it was sent (added to the collection). This ensures that the messages can be retrieved (de-queued) in the same order sent. This is referred to as a “first-in, first-out” collection (as opposed to something like the Stack collection which is a “last-in, first-out” collection). So, as messages are queued they get added to the bottom of the queue. As messages are received, they pull from the top of the queue.
The following code (Listing 7) creates an instance of the Queue class with an initial capacity of six. Note that once this capacity is reached, the queue can automatically increase its capacity. The code then adds four messages using the Enqueue method. Finally, the code loops through the queue's messages and writes their contents to the console.
Listing 7: Demonstration Code for the Queue Class
Imports System.Collections

Module Module1

  Sub Main()

    'purpose: demonstrates Queue Class

    'create a new instance with initial capacity of 4
    Dim q As New Queue(capacity:=6)
    Dim i As Int16

    'send messages to the queue
    q.Enqueue("This")
    q.Enqueue("is")
    q.Enqueue("a")
    q.Enqueue("Test")

    'loop through the queue's messages
    Do

      'peek at the next message
      Try
        q.Peek()
      Catch
        Exit Do
      End Try

      'remove message and write to console
      Console.WriteLine(q.Dequeue().ToString)

    Loop

    'keep console app running while waiting
    Do While Console.ReadLine <> "s" : Loop

  End Sub
You can loop through queues using multiple methods The queue class contains a Count property that can be used to establish when a queue is empty. The Queue class also has a GetEnumerator method that can be used to enumerate the collection's messages. The prior example simulates something more natural in the messaging domain; we peek at the next message and then remove it. Peek enables you to examine the contents of the message before removing it from the queue (Dequeue). Of course, when peek is called and the queue is empty, it raises an exception (which exits Do Loop).
The Graphics Class
Computers wouldn't be of much use without an interface. Everything meant for user consumption must be output (drawn) to a screen or piece of paper. This includes buttons on toolbars, borders around windows?even the computer's text has to be drawn to the screen. Windows does its drawing through the Graphics Device Interface (GDI) library. Past versions of VB did a good job of hiding this functionality, often too well. The only real drawing access VB6 developers have (outside of third-party tools and libraries) are to a handful of methods and some access to a difficult-to-transverse set of API calls. The .NET FCL introduces an expanded graphical library called GDI+. Thankfully, VB developers have complete access to this library through a group of object-oriented classes.
At the heart of these classes is the Graphics class. The Graphics class represents a drawing surface in Windows. This includes forms, printers?anything that can receive graphical output. With its many methods, the graphics class enables you to draw to any Windows graphics surface. Possible output includes: lines, curves, ellipses, rectangles and text. You can rotate, stretch, or transform output; you can fill objects with brushes and manipulate images. The Graphics class raises the VB developer's level of output capabilities.
The following example (Listing 8) is provided to demonstrate the power and ease of use of the Graphics class. First, a button is added to the form. The button's click event is represented below. Inside this event, code is added to draw a rectangle on the form's surface. The gateway to the form's design surface is the CreateGraphics method. This method “opens” up the form's design surface. Upon creating the rectangle, the rectangle is then filled using the Graphics.FillRectangle method.
Listing 8: Graphics Class Code
Private Sub Button1_Click(ByVal sender As System.Object, _
    ByVal e As System.EventArgs) Handles Button1.Click

    'create a graphics object from the current form
    Dim mySurface As Graphics = Me.CreateGraphics

    'create a rectangle structure
    Dim myRect As New Rectangle( _
        x:=2, y:=2, Width:=50, Height:=100)

    'draw a rectange to the drawing surface
    '   uses a pen object and a rectangle structure
    mySurface.DrawRectangle( _
        Pen:=New Pen(Color.Black), _
        rect:=myRect)

    'fill the rectangle
    mySurface.FillRectangle( _
        Brush:=New SolidBrush(Color.Red), _
        rect:=myRect)

End Sub
This example may be simple, but it shows you how easy it is to render your own graphics. Think about the task of creating your own bar graph; not very intuitive in VB6?now almost trivial with .NET.
Conclusion
As you can see the .NET Framework provides a number of useful and interesting classes. These classes are just the tip of the iceberg and we hope you will take time to explore the .NET Framework for your own top ten.
Table 1:Upload/Download Methods of the WebClient Class
| Property | Description |
|---|---|
| DownloadData | The `DownloadData` method takes a string value representing a URL address as a `parameter,` and returns a byte array of data returned from the specified address. |
| DownloadFile | The `DownloadFile` method takes both a URL address and a filename as parameters. The file will be downloaded to a local drive. |
| OpenRead | Similar to the `DownloadData` method, OpenRead accepts a string parameter representing the target URL. It returns a Stream object that, when accessed, enables you to read data from the target URL. |
| OpenWrite | Similar to the `OpenRead` method, OpenWrite takes a string address `parameter` and returns a writable stream that can be used to place data into the specified URL. |
| UploadData | UploadData enables you to specify a URL and a byte array for upload. Optionally, you can further specify the method of the upload (a verb understood by the receiving URL, such as 'POST'). |
| UploadFile | The `UploadFile` method accepts a URL, filename, and, optionally, a method verb. The method will upload the specified file and return a byte array representing the response of the target URL (if any). |
| UploadValues | The `UploadValues` method enables you to upload a name/value pair collection to a URL. |